Posts

Showing posts from January, 2016

Space Wolves Storm Wolf #8

Image
Cork is completed on the flying base. It took about a day or so for the PVA glue to dry, given the clamping required. Moving onto to adding the grit/ballast to bring texture on the surface. Which took another day and a bit to dry. Now I haven't actually glued the flying stand to the base, yet, as I will remove the clear plastic stand when i come back in and airbrush the base.  

Terrain for Heresy 30k #1

Image
So as my games of Heresy increase in size and scope from the simplistic Betrayal at Calth board tiles, I got my hands on a fat mat and a few other sundry items. One of the things I quickly noticed is that I need to add some more 3-dimensional terrain.  First my journey started with the Aegis Defence Line.  But then I was trawling the interwebz for scatter terrain when I happened upon a flyer from Value Gear Model Building Details. The "I didn't get shit for Christmas!" sale. Awesome name hey ? So I trawled through their site and placed a few orders for stowage and trailer loads. Cobbling these together on a piece of plasticard, this is what I came up with. Keeping the stowage to the ends of the pieces, leaving space for a 32mm base between.     More to come.

Space Wolves Storm Wolf #7

Image
Finally found some time start the base on my Storm Wolf. Yes, the vary same Storm Wolf I post an update about, about once a month. This time I am building up the base, initially with layers of cork. I have cut away the cork to allow for the flying stand. I added some pins to the stand to improve the strength.  More to come.

The Unforgiven - Dark Angels #11

Image
Work continues on the Unforgiven Praetor. This time some work on the cloak. More to come.

Barricades and the Aegis Defence Line #4

Image
Weathering has begun on the Aegis Defence Line. Looks pretty crappy at the moment. I'll need to pull this one out of the trash and add some Typhus Corrosion and Ryza Rust.   More to come.

30k Fluff - Nykona Sharrowkyn #1

Image
The Fluff (Courtesy of Lexicanium) : Nykona Sharrowkyn was a member of the elite Mor Deythan of the Raven Guard Legion during the Horus Heresy. Incredibly talented, he inherited his Primarch's ability to "Wraith-slip" and could literally evade light and walk instinctively in shadows, giving him an almost ghost-like ability to infiltrate. He held the incredible accolades of being one of few beings to shoot a Primarch in the head with a Sniper Rifle and survive, and also besting Lucius the Eternal twice in sword combat. Modelling: So there is no model for Nykona, yet. And the fluff disappears and dries up. What happened to him? Did he remain with the Raven Guard or separate with the shattered legions joining another Chapter? Or does he get drafted into the nascent Grey Knights, under Garro? At the crux of it lies my take on Nykona, based on Captain Korvydae, with a resin helm from Anvil Industries and power swords from Maxmini. My Sharrowkyn is modelled after h

Bloodclaws Pack #8

Image
Backpacks completed on the final few Bloodclaws.   Just the shoulder pads left to do.   While I was waiting for the yellow wash to dry on the  shoulder pads, I thought I would quickly throw together a Frost Cannon, plays as a Plasma Cannon. Wh at do you think of a Frost Cannon on a Long Fang? Rumor says a new Wolf Supplement is coming, so finger crossed this might be coming?

Objective Markers #11

Image
Finalizing the weathering on the drums. Still have to go back in and add weathering powders.   Not long left on this one.

Space Wolves Venerable Contemptor Dreadnought #11

Image
More progress on the Contemptor Dreadnought. Gold/brass and bone work has begun. In addition, preliminary work on the fur is done. Airbrushing the graduation on the claw is finished.Just have to go back in and complete the fine details.  Before the ink washes on the fur and bone was completed. More to come.

Horus Heresy 30k and the Vlka Fenryka #11

Image
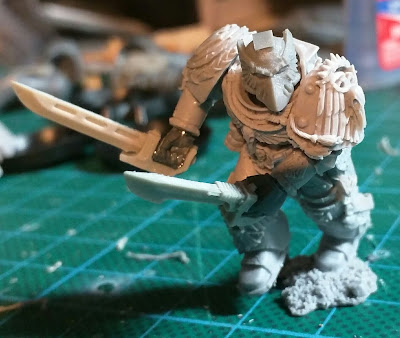
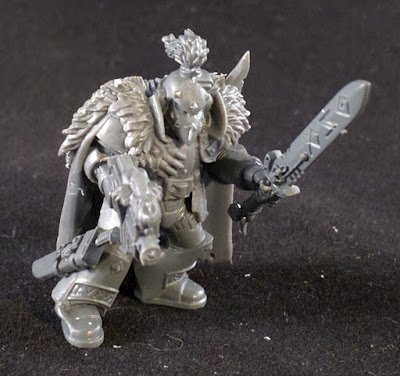
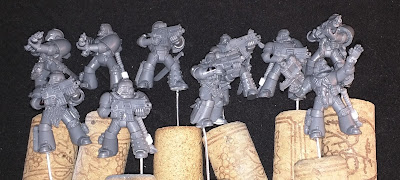
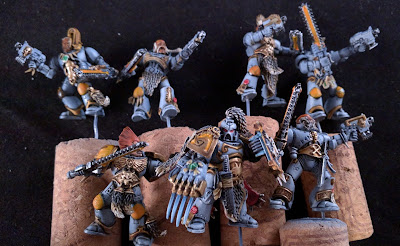
While I was building the Veteran Tactical Grey Hunter Squad, I thought I would kitbash some sergeants to sprinkle into the squads. This Veteran is a mix of Chaos Warrior, Space Wolf Legs and MkVI plumed helmet. He has a Bolter and Power Weapon. I was still working on his pose, with the sword, trying to make it a little more dynamic.   On this Veteran, I used the Chaos Warrior, some B@C legs and MkIV plumed helmet, an Anvil Industries combi-weapon (melta-gun) and a devastator pointed hand.   For this Veteran, I have used the Chaos Warrior with mainly a combination of B@C parts. The combi-weapon (flamer), combat blade, power fist. I cut the plumed helm from the B@C sergeant and repositioned it, mainly to differentiate it, but it looked so much better. This Veteran is based on the Chaos Warrior with B@C Legs, an Anvil Industries combi-weapon (meltagun), and MkVI helmet from the Dark Vengeance Raven guard Model. The Chainsword was salvaged off the Dark Vengeance

Horus Heresy 30k and the Vlka Fenryka #10

Image
I finally got around to building my Grey Hunter veteran tactical legionnaire squad. It's a twenty (20) man bolter squad. Below is a snippet of a few of them ready, on cork, for washing and painting. They are mainly a majority of Betrayal at Calth (B@C) MkIV Maximus armor with a sprinkling of Space Wolves torsos. I have also attached grenades, holstered pistols and a bunch of either Combat blades or Hand Axes. I have also started on the bases for this squad. Basic cork and PVA, so far. I will add the rest of the usual ballast grit, paint and tufts. More to come soon.

Bloodclaws Pack #7

Image
I have completed the first of my Wolfguard Pack Leader for my Bloodclaws. He's essentially the sergeant of this squad. I am still deciding over what back pack to use for him, i.e. should I use a banner pole or the servo skull, mainly because I am thinking  I might double this as a Sergeant in a Destroyer squad for 30k. Now it's off to complete the rest of the Bloodclaws pack.

Bloodclaws Pack #6

Image
Final Detailing on the Bloodclaws pack is nearly finished. Just finishing the fine details and the bolt pistols. Hopefully the next time you see these folks, they'll be done.

Objective Markers #10

Image
Progress on some of the other Objective Markers. This time it's the gun tractors from Anvil Industries. The base coats and preliminary highlights on the chassis have been finished, but still a lot of work to do on the missile turret and tracks, and little details on the chassis. More to come.

Barricades and the Aegis Defence Line #3

Image
Further progress on the barricades. Gun Metal shaded down then drybrushed back up with two progressive coats of drybush Vallejo Game Color Gunmetal and Silver. Also the Vallejo Game Color Brass was added to the vision slit and eagle motif, then shaded down with Vallejo Game Color Wash Sepia. Just need to highlight the brass back up, then tuck into the chipping back to the rusty yellow ochre which is already beneath this layer. More to come.

Space Wolves Venerable Contemptor Dreadnought #10

Image
Progress on the Contemptor, taking it back down to the more traditional grey tones. I even started the blue transition on the power claw. Now I just have to finish off the edge highlight, do the fur and fetishes, bring out the details. Oh, and do the legs, too. More to come.

Barricades and the Aegis Defence Line #2

Image
Continued progress on the Aegis Defense Line. Over the top of the Chipping fluid I put down a base of Vallejo Game Air Imperial Blue, followed by a dusting of Vallejo Game Color Turquoise, with a dry brush of Vallejo Game Color Pale Blue Grey. Gunmetal Grey was then put down to accent the reinforcing. with black-lining wash into the recesses. Now to add Gold on the remaining trim. Then start the chipping.

Barricades and the Aegis Defence Line #1

Image
It's interesting to note that the Betrayal at Calth set comes with tokens for barricades and doors. Given the hex set-up, I thought it would be better if I dusted off my box of  the GW Aegis Defence Line and use them instead of the cardboard chits. Given the miniatures were all grey plastic.  I threw on some primer, a couple of coats of  Vallejo Model Air Burnt Umber, and Yellow Ochre. In the bullet holes I sprayed Vallejo Model Air Black. I then sprayed Testors Dull Cote, to seal them up, then put down a layer of AK interactive Heavy Chipping Fluid. The photos were taken while the Chipping Fluid was drying. To do ... Lay down the primary colors, then get stuck into the weathering. More to come.