Posts

Showing posts from May, 2016

Horus Heresy 30k Vlka Fenryka Cataphractii #7

Image
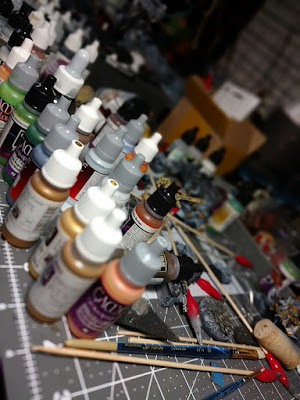
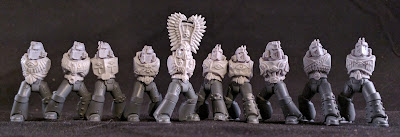
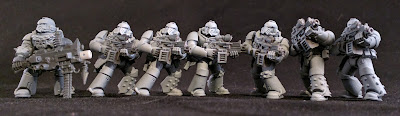
Back in the saddle, but down an airbrush compressor. Oh well, guess I need to finish off the Cataphractii. So I got stuck into the right side arms, this time around, whilst I go scrounging for the shoulder pieces for the left side.  A dash of Vallejo Game Air Steel, washed back with my black-lining solution, then dry-brushed back up with Vallejo Game Air Aluminum. I might have to get some other colors onto the combi-bolters, maybe copper for the bolt round casings, just to give them a little contrast. And I will need to paint the leather straps, whilst I am at it. More to come.

Disaster Strikes!!

So you go away for a wonderful time, with your significant other, and come back to what you expect would be a productive weekend of painting, especiialy because it's Memorial Day long weekend. You sit down at the bench get your plan of action together and turn on the airbrush compressor. And then you hear this weird depressurization sound .. coming from your compressor. Water is pouring out underneath the compressor and your look at it saying, "What the .. ?" Apparently I experienced something that can happen in older cheaper compressors. Water collects inside the tank and if you don't use the compressor everyday, and/or remember to drain it once a month, water condensation will collect inside the tank. When water sits for a while on a mild steel tank, it rusts. And when you then go and pressurize a tank the rust erosion, eventually, will eat the vessel cylinder pretty thin, to the point where a hole appears and air and water will escape. Rendering compressor u

Time Off

Taking a few days off to have a quiet birthday and anniversary with the wife. Who knows, I might even get some time to paint, so fingers crossed. Anyways, catch you in a couple of days!

General Ramblings #24 - Do you need a clean work area ?

Image
As the title says, do you need a clean work area to be effective ? Well it really depends on your personality. Some of us like clutter, others don't. Or if you fall into the third bucket, you have things put around, because you know exactly where it is ... ? Like paints.  Airbrush equipment.   Or unceremoniously dumped projects. Guess I am going to have to go pull my finger out and clean up a bit ?

General Ramblings #23 - Airbrushes

Image
Recently I was asked about airbrushes. What do I use? What would I recommend? To be honest, I had to stop and think about it. I use an Iwata Eclipse HP-CS for most of my work. It's a work horse, can push about any paint you stick in the cup. If you don't believe me, have a look at the work Kenny Boucher, from Next Level Painting, does. I recommend the Eclipse to anyone who is getting into airbrushing. So forgiving and still gives good results. Previous to this I used a Badger Patriot 105, which is still a good airbrush, of itself, but ultimately would have achieved better results in more capable hands. I did swap the original 0.5 needle for a finer 0.3 needle, via an upgrade kit and it was a workhorse but ultimately I found the Eclipse a more reliable airbrush to use.

Horus Heresy 30k Vlka Fenryka Venerable Leviathan Dreadnought #5

Image
Stop the press! .. Battle Bunnies snapped a photo at Warhammer Fest. A Vlka Fenryka Leviathan paint scheme. Embellished with scrolling knot-work on the carapace and lower left leg. Fur pelt on the right shoulder. And I have just the canvas to make this happen.

Horus Heresy 30k and Thousand Sons #4

Image
I made some test  paint jobs  to see how a metallic red scheme would look. Vallejo Game Air Steel base coat with a few layers of Minitaire Ghost Tint Blood Red. Now A few things have to be said about the Ghost Tints, you have to turn the air pressure on the compressor down a  bit and do multiple coats. Ghost Tint does give the test pieces a relatively worn and non-uniform look. The silver shines through as the automatic highlights.   There is one issue though, because I painted the Ghost Tint as a zenithal highlight, the underneath angles are pure silver. I am guessing I will have to come back and shade wash then undersides, when it comes to shading and gold trim and highlights. More to come.

Horus Heresy 30k World Eaters Ravagers #1

Image
Progress on the Ravager Squad Sergeant. First up a Sepia wash on the brass, to bring the gold back to a tarnished finish. Then I got to work on the axe head.  Initially I tried out a green tinted head, but I think it gets lost on the model. I'll keep it for the time being, until I add red to the symbols and some blood splatter. Hopefully the green will then pop as a contrast to the red on the model. Stay tuned. More to come.

Horus Heresy 30k and Thousand Sons #3

Image
I've been looking around for inspiration on the paint scheme for the Thousand Sons and think I have finally settled on a scheme.   Digging through my old Heresy Visions books, I found a couple of pictures from Sam Wood and Justin Norman that had color schemes that I would be happy to work with. First up, from Visions of Darkness is  Justin Norman's Nebmaetre Heavy Support Squad, depicted what is arguably metallic red with golden highlights. Note the golden face plates and chest pieces. Following this was from Visions of Treachery Sam Wood's Uthizarr. So things to note in both of these pictures, for pre-Heresy Thousand Sons: Glossy red armor plates. Edging and highlights are gold. Tabards are white. Seals or other paraphernalia are blue. Simple really? Stay tuned

Horus Heresy 30k World Eaters #12

Image
Progress continues on the World Eaters. Base colors continue. More to come.

Horus Heresy 30k Vlka Fenryka Cataphractii #6

Image
Progress on the Cataphractii. This time I completed the face. Just have to finish off the arms. More to come.

Horus Heresy 30k Vlka Fenryka Venerable Leviathan Dreadnought #4

Image
Primer base colors are down.  I did some experimental pre-shading on the Leviathan, and wouldn't you know it, I found an awesome shade of Pre-Heresy Wolf Grey, which got me thinking, maybe I should switch up my Vlka Fenryka color scheme. Remember I haven't actually put down any layers of grey yet. This was purely a "gangsta-gumbo" in my airbrush cup as I transitioned from Vallejo Polyurethane Primer German Grey to Light Grey, I just was too lazy to clean out the cup, between colors. Here is how it turned out with the Plasma Blaster and Snippy Claw.   Oh by the way, did I mention I magnetized this sucker ?   With a Storm Cannon. And the Grav Bombard.   Stay tuned, next time I will do some color modulation on the panels, with some actual grey layer paints.

Horus Heresy 30k Vlka Fenryka Venerable Leviathan Dreadnought #3

Image
Better not skip leg day. Well posing of the legs, that is. Putting the pose together with the base. Trying to get the feeling of the Leviathan stepping up over rubble, while shooting. As such, nothing is glued, yet, while I fool around with positioning.  I think I settled for this pose, in the end. More to come.

Horus Heresy 30k Vlka Fenryka Venerable Leviathan Dreadnought #2

Image
Sand is down, on the base. Primer next.Then it's off to the races and posing the legs on the base. I lost some of the skull details, but you sometimes get that when you are liberal with the sand.

Horus Heresy 30k and Thousand Sons #2

Image
My focus has finally shifted back to the eternal battle between the Thousand Sons and the Vlka Fenryka. With that thought, I set to working on my first Thousand Sons Tactical Squad. Using a conglomeration of Betrayal at Calth legs, heads from Forgeworld. Finally the torsos and Sergeant helmet came from Warex Miniatures . Arms and bolt-guns to follow, maybe I will dig up some kopesh swords and staves. More to come.

Horus Heresy 30k Vlka Fenryka Venerable Leviathan Dreadnought #1

Image
I believe I teased this one, late December 2015. And Yes, that's a fair while ago. Wow, a really long time ago. Anyways, I have moved enough projects down the road to get some time to start working on my Leviathan Dreadnought. Hopefully I can have it ready in time for when the next Heresy book Seven (7) drops. So after washing and clipping the resin, I started posing the legs, trying to get a dynamic feel to them, as they stride across the battlefield. After working out where to place the cork and how to make a dynamic pose, I glued them to the base and started  adding scatter and debris. A few skulls, are an absolute must in the grim dark, but I also added some corpses. Thousand Sons are the favorite morning meal of any good Vlka Fenryka, so they were naturally part of the scatter. More to come.

Horus Heresy 30k World Eaters #11

Image
 Base colors and preliminary work on the World Eaters.  Have to go back in and start laying down the rest of the base colors, now. More to come.

Horus Heresy 30k Vlka Fenryka Cataphractii #5

Image
Progress continues. This time I put some bases on the Cataphractii, the heads are nearly ready and I am working on the arms, too. More to come.

Horus Heresy 30k World Eaters #10

Image
As I mentioned in my last post, I am trying out a new technique using oil washes.  So instead of going straight to a character model, I am going to try it out on a rank and file World Eater Rampager. This is the test model that I will use. I will have to paint him up to the same  stage as the Sergeant, so I can see the oil wash effects. I will concentrate mainly on the white armor plates. Give them a worn look which is more consistent with the Heresy aesthetic. More to come on this.

Horus Heresy 30k World Eaters #9

Image
Some progress shots of how the paint job on the World Eater Rampager Sergeant is coming along. The white was made up of a Vallejo Polyurethane Primer German Grey, then a zenithal pre-shade of Vallejo Polyurethane Light Grey Primer, followed by a few light coats of Vallejo Game Color White. The skin was essentially the usual recipe, but this time I put color down directly on the white, 50/50 mix Vallejo Game Ink Flesh-tone and Sepia Wash. This is how it looked after the first highlight of Vallejo Game Color Beige Red. And then Vallejo Game Color Light Flesh, with a final highlight of 50/50 Light Flesh and White. I then went back in and painted the edges with Vallejo Game Color Brass. The blue accents are very thinned layers of Vallejo Game Air Imperial Blue. I will have to come back and clean up any white panels where color has spilled over, helmet,elbow pads, etc.   When I finish the base colors, I will seal the model in a gloss varnish and try out a new shading techn

Horus Heresy 30k and the Vlka Fenryka Scouts #5

Image
Finished off some of the face details on the Wolf Scout sergeant. I have a simple method for painting faces. First up a base of Vallejo Game Air Dwarven Flesh. Then a shade wash in the recesses with a 50/50 mix Vallejo Game Ink Flesh Wash and Sepia. The first highlight of Vallejo Game Color Red Beige. Second highlight of Vallejo Game Color Light Flesh. And a final highlight of 50/50 Vallejo Game Color Light Flesh and White. Now you can layer it on layer by layer or dry-brush, depending on how much time you have. I chose to dry-brush, this time around.  Time to go back and clean up the armor and work out how to do the camouflage pattern. Heresy and Heroes has a good article about how to do a version .

Horus Heresy 30k World Eaters Praetor #1

Image
So when I had last left off on this I had rebuilt the arm to fit a 30k weapon. The only issue was, I could not decide on what weapon, pistol, bolt-gun, volkite, plasma .. decisions, decisions. In the end I opted for a combi-weapon. The Praetor in his full regalia, minus the new weapon. Without the mantle, but with the new combi-weapon, whilst I was working on it. Off to wash the model, and lay down some paint.

Shield Brothers Landraider Kit-Bash #22

Image
It has been a while since I picked up this little project. Working out what worked best for rivets. Water filter pellets, round styrene rod cut-offs. All of them serviceable, but didn't really work for me. I had almost given up and shelved the project. Until I found these. MasterClub spherical 1.0mm rivets in resin. Made in Russia, and took ages to get to California, but they're here. And this is what you can do with them. Drill a few pilot holes, crack out the super glue and poke these fiddly little suckers into the holes.   And this is how it turned out. I think I might have to dust this project off and finally finish it.