
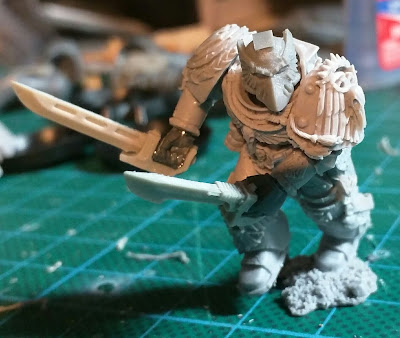
Tutorial - World Eaters Contemptor Dreadnought Part #2 - Legs
So let's start off with
the statically posed B@C Plastic Contemptor model.

Before you assemble the front and back halves, you will need to cut the center pelvis area from the legs, leaving the rounded hip bearings and upper legs attached to the lower legs. Trim this as close to the upper leg bearings. This should be fairly easy if you do this before you glue the front and back together.


Above is the two sections that you'll want to aim to cut. The front and rear sections of the pelvis.


Make the first two cuts as close to the outer portion of the hip joints, Aim to make this as flush to those as possible.


The third cut is across the top of the pelvis. Again try to make the cut as close to the bottom of the lower torso as you can. This is more to salvage to lower torso section as this will be where you will mount a magnet, later.
This will give you a front section and a rear section for the pelvis area and the legs.
Now, next you'll need to grab your handy-dandy spare Castaferrum (box) Dreadnought pelvis area.
 So once you've cut the hips free from the sprue, you'll need to cut these hips too.


Make sure you cut these close to the outer section of these hips too. You want to salvage the upper legs and center pelvis. cutting the pipes is OK, because you can either choose to green stuff new pipes or just leave them off, like I did.

Now at this stage I went in a glued the front and back pelvis sections, from the original Contemptor Pelvis. There was a little trimming to be done on the inside of the front section, to get it to fit to the box Dreadnought pelvis.
Next we go back to the Contemptor Dreadnought legs.

To start off you need to make a few cuts to the front and back sections, just above the knee pads.

This is what it should look like, when you cut the upper leg free.

So when you purchase a resin Forgeworld Contemptor Dreadnought, usually it comes with four (4) different foot options. Given that you usually have a pair sitting about, I thought it would be a great time to go and appropriate them for this project. But before you can use them, you'll notice that the plastic B@C still has its feet attached, so that's where you need to make the next set of cuts.


Once you're relatively happy with the smoothness of the cuts, you can start posing the new resin feet.

So now you have the following parts:


Before you assemble the front and back halves, you will need to cut the center pelvis area from the legs, leaving the rounded hip bearings and upper legs attached to the lower legs. Trim this as close to the upper leg bearings. This should be fairly easy if you do this before you glue the front and back together.


Above is the two sections that you'll want to aim to cut. The front and rear sections of the pelvis.


Make the first two cuts as close to the outer portion of the hip joints, Aim to make this as flush to those as possible.


The third cut is across the top of the pelvis. Again try to make the cut as close to the bottom of the lower torso as you can. This is more to salvage to lower torso section as this will be where you will mount a magnet, later.
This will give you a front section and a rear section for the pelvis area and the legs.
Now, next you'll need to grab your handy-dandy spare Castaferrum (box) Dreadnought pelvis area.


Make sure you cut these close to the outer section of these hips too. You want to salvage the upper legs and center pelvis. cutting the pipes is OK, because you can either choose to green stuff new pipes or just leave them off, like I did.

Now at this stage I went in a glued the front and back pelvis sections, from the original Contemptor Pelvis. There was a little trimming to be done on the inside of the front section, to get it to fit to the box Dreadnought pelvis.
Next we go back to the Contemptor Dreadnought legs.

To start off you need to make a few cuts to the front and back sections, just above the knee pads.

This is what it should look like, when you cut the upper leg free.

So when you purchase a resin Forgeworld Contemptor Dreadnought, usually it comes with four (4) different foot options. Given that you usually have a pair sitting about, I thought it would be a great time to go and appropriate them for this project. But before you can use them, you'll notice that the plastic B@C still has its feet attached, so that's where you need to make the next set of cuts.

Once you cut the feet molding free, you'll need to file the and clean these flat.

Once you're relatively happy with the smoothness of the cuts, you can start posing the new resin feet.

So now you have the following parts:
- Pelvis section

- Two Upper leg sections


- Lower Legs and feet

So now you need to go in and start dry-fitting the leg portions. Get a feel for how you want to pose the legs.

Once I had worked out the positioning of the feet, I had to go back in and trim the lower section of the upper legs to fit the knee sockets. So I cut right at the pistons and rounded off this section with a sanding stick

After this I rolled together a couple of balls of "green-stuff" and made the final adjustments and fitted the legs together for the final time.

And there you have it folks, how to re-build a B@C Contemptor Dreadnought's legs.
Now I did go back and add a piece of cut styrene tubing. This echoed the actual armor on the real Contemptor. It's a pretty simple thing to do. The rivets are the biggest time sink in all of it. And to create those I used an RP Toolz Punch and Die set, but it you have steady hands you just need to cut some 0.9mm styrene rod into little nubs, and glue them on.

Stay tuned for next time, when I go through how I modeled the torso and a final installment for the Close Combat Claw.


Comments
Post a Comment